
Fresh Baked Pi 🥧 #
Raspberry Pi’s are tiny but powerful computers that can be used for tons of DIY projects. Since Raspberry Pi’s are so small but have full computational, networking, and hardware capabilities, they are great tools for making robots, internet-of-things devices, networking services, and much more.
[0] Raspberry Pi Set Up #
[Setup Script] #
- Take the USB to MicroUSB cable and plug your Pi in. You can plug it into your computer or into a power outlet with a USB power plug. The red and green lights on the side of your Pi should turn on and flash once it is powered.
- Connect your computer to the
RPIWIFInetwork. - Type the following into your terminal window:
ssh setup@raspberrypi-N.Replace
Nwith your Raspberry Pi number. - When prompted for a password, enter
setup. Once this command runs, you will be remotely controlling the Pi through the wifi network it is broadcasting! - The Pi will automatically run a setup script. Choose option
1. User Setup. - Follow the instructions in the script to setup up a new user.
Your username must not contain any spaces. Only the first word you enter will be used. It also must be all lowercase.
- After you finish the setup script, your Pi will reboot and your remote connection will be closed.
[sudo Access] #
Before we move on, we need to grant you user account administrative access on your Pi. This will also give you the chance to practice logging in and out of ssh connections.
- Create a new ssh connection, this time to the
piaccount. You can use the commandssh pi@raspberrypi-NReplace
Nwith your Raspberry Pi number.If your Pi number is a single digit such as, 05, user the format
ssh pi@raspberrypi-5 - Enter the password
cs10_2020_teacher - Once logged in, run the following command to give your user admin (or root) access (replace
<YOUR_USER>with the user you created in the setup):sudo usermod -aG sudo <YOUR_USER> - Enter the command
exitto exit the current ssh connection - Reconnect with your user.
ssh YOUR_USERNAME@raspberrypi-NReplace
YOUR_USERNAMEwith the user your created.Replace
Nwith your Raspberry Pi number. - Run the command
groupsand make sure thatsudoshows up in the list.
You now have root access which will allow you to install new programs on the Pi!
[File structure & Updates] #
Because you are remotely connected to your Pi through your Terminal, the Terminal is the only interface you have to navigate the file structure and run programs. Fortunately, you have tons of experience with this tool from cs9. If you need a refresher, check out the Terminal lab from cs9.
When you log in to your Pi, you will be taken to the home (~) directory of your user. There’s no
Desktop on the Pi, so we’ll treat this as out home base. Just like in cs9, cs10 will have it’s own
directory with a directory for each unit and more directories for each lab or project.
mkdir cs10
cd cs10
mkdir unit_00
cd unit_00
bash <(curl -sL https://raw.githubusercontent.com/the-isf-academy/courseware/master/cs9_student_setup/gpio_setup.sh)
[Writing code] #
The remote connection to the Raspberry Pi also means that there is no graphical interface for text editing. You can’t run Atom on the Pi, only editors that run inside the Terminal. However, there is a way to use a graphical text editor on your computer to edit the files on a remote device like your Pi. To do this, we need to connect Atom to the SSH tool you use to access your Pi.
💻 To set up remote text editing over SSH, run the following commands in a Terminal window on your computer (you may need to put in the password for your computer):
sudo apm install remote-atom
printf '  "remote-atom":\n    launch_at_startup: true' >> ~/.atom/config.cson
In the below command, for raspberrypi-N replace the N with your Pi number.
printf "Host raspberrypi-N\n\tRemoteForward 52698 localhost:52698\n\tUser user" >> ~/.ssh/config
💻 Now, run the following lines on your Pi over an SSH connection:
sudo curl -o /usr/local/bin/rmate https://raw.githubusercontent.com/aurora/rmate/master/rmate
sudo chmod +x /usr/local/bin/rmate
sudo mv /usr/local/bin/rmate /usr/local/bin/ratom
Now, whenever Atom is open on your computer and you are connected to your Pi via SSH, you can use ratom file.py to open a file from the Pi in Atom on your computer!
[Running code] #
Now that you have a Python file on your Pi, you can write and run your very first Python program from a Raspberry Pi.
💻 Write your first Python file on your Pi!
It should print, Hello World!.
ratom hello_world.py
💻 Run the file and make sure it works as expected.
python3 hello_world.py
Congrats! You are all ready to get started on your first Raspberry Pi project!
[Useful Raspberry Pi Commands] #
| Command | Description |
|---|---|
| exit | exits the SSH connection |
| sudo shutdown now | shutdowns the Pi |
| reboot | reboots the Pi |
| ssh USER@raspberrypi-N | starts an SSH connect with your USER and your N numbered Pi |
[1] Pseudocode #
You’ve seen a demonstration of a Raspberry Pi that’s connected to an LED light and a press-button. When the button is pushed in, the LED lights up. When the button is released, the light turns off.
✏️ In your notebook, write pseudocode that describes how you think the button-activated LED works.[2] Using the LED #
[Hardware Set Up] #
Let’s begin by connecting our LED to the Raspberry Pi. To do this you will need:
- 1 Raspberry Pi
- 4 internal-to-internal jump wires
- 1 3-color LED component
Below is a diagram of the General Purpose Input/Output (GPIO) pins. Each pin has a specific function and a pin number. For this first step we will use 1 Ground pin and 3 GPIO pins. Reference the pin numbers and pin functions when connecting the LED.
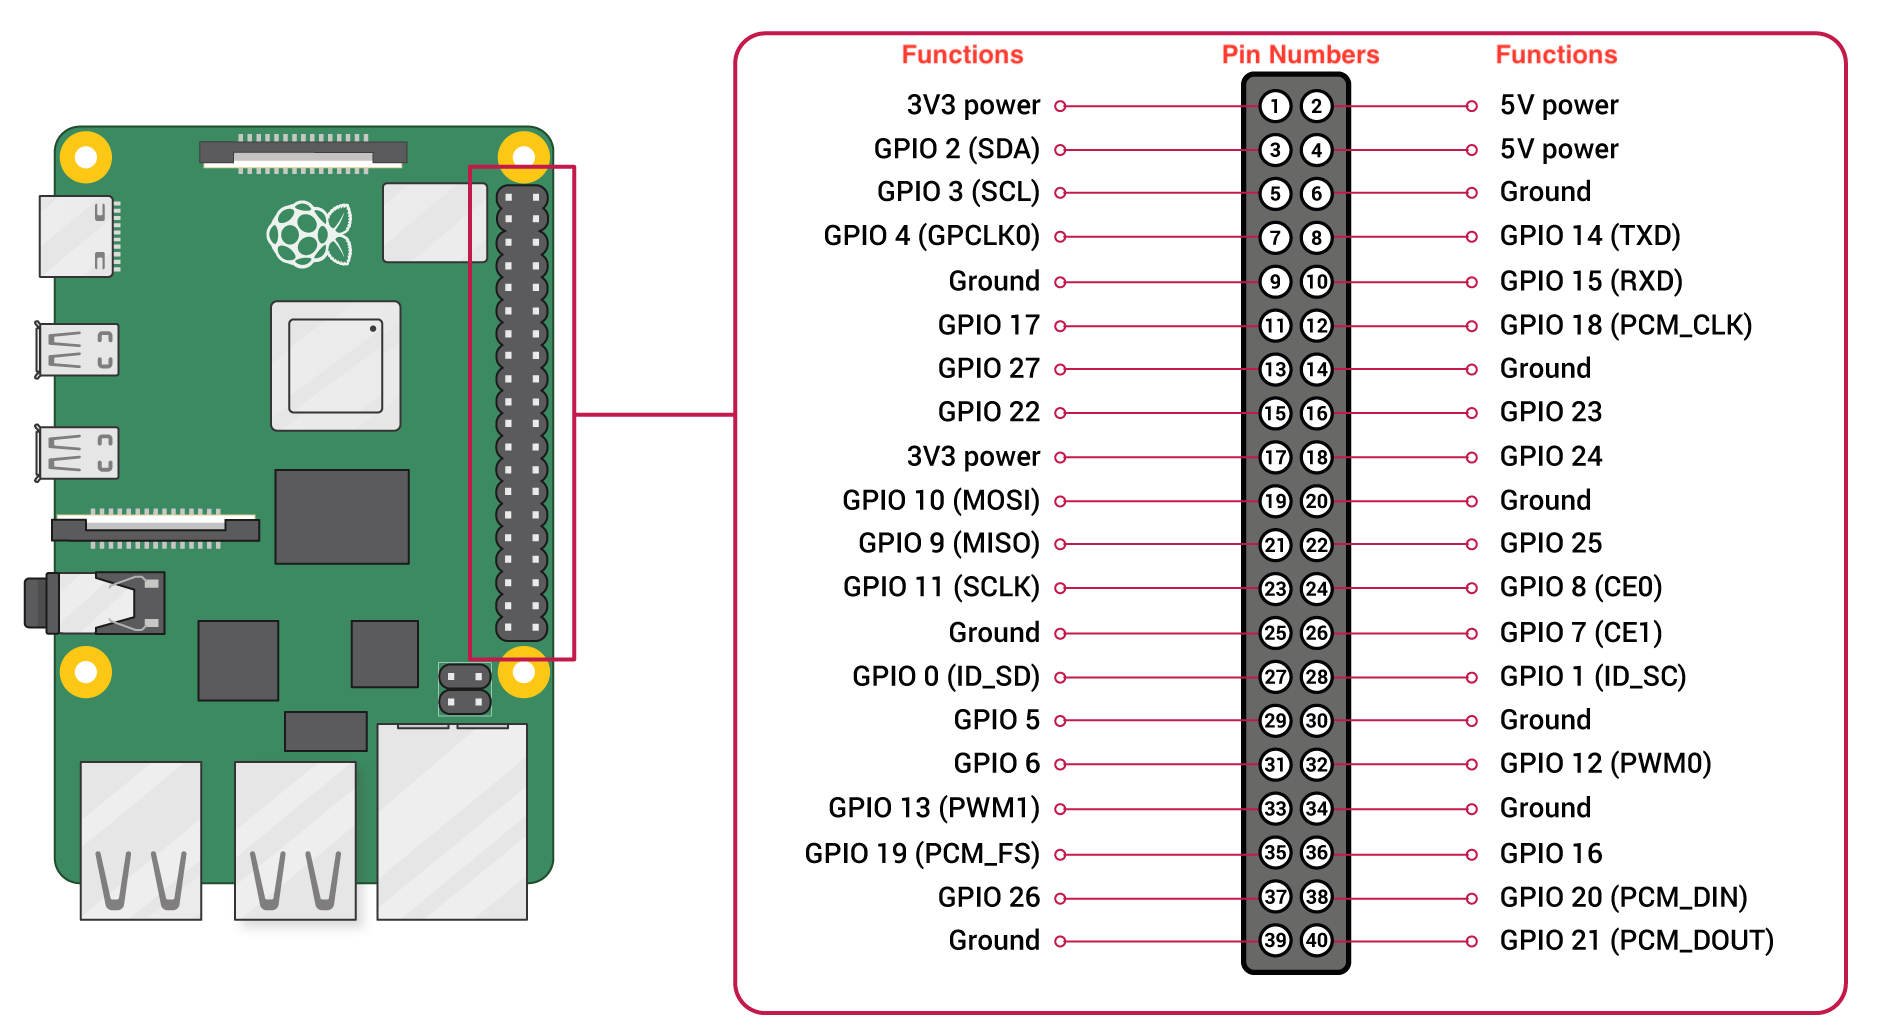
- Connect
1 jumper wireto the9, 11, 13, and 15pins - Connect the
Pin 9wire to the-LED component pin. This is theGroundpin. - Connect the
Pin 11wire to theRLED component pin - Connect the
Pin 13wire to theGLED component pin - Connect the
Pin 15wire to theBLED component pin
This is how your Raspberry Pi will look when hooked up to the LED.

Although the wires below are color coded, it is not necessary to do so.

By connecting the R, G, and B LED component pins to the GPIO pins of the Raspberry Pi, we are able to send power to each color. The Ground LED component pin (labelled with -) completes the circuit, allowing power to flow through and power the LED.
[Coding the LED] #
Now it’s time to turn on our light!
💻 Clone the lab_sensors repository
in your cs10\unit_00 folder.
git clone https://github.com/the-isf-academy/lab-sensors-YOUR-GITHUB-USERNAME.git
💻 Create a simple program that turns the light on and off.
Write your code in the file called button_activated_light.py
To get you started, here are a few basic methods from the LED class that you can use:
| Method | Input | Example Use | Explanation |
|---|---|---|---|
| Create a new LED object | GPIO pin | light = LED(17) | creates an LED object for the given pin |
| off() | None | light.off() | Turns the device off |
| on() | None | light.on() | Turns the device on |
Note: The GPIO pin is NOT the same as the Raspberry Pi pin. GPIO pins are listed in the diagram under Functions. So far,we have used GPIO pin numbers 17, 27, and 22
✅ CHECKPOINT:
Before moving on, think about how you would troubleshoot a light that wasn’t turning on. In your notebook, answer the following question:
How would you determine whether the bug was in your code, or if it was a hardware problem?
👾 💬 FYI: LED class
There’s lots that you can do with the LED class, like making the LED blink indefinitely, and more! This is a great resource for you to use as you explore the Raspberry Pi:
More LED Methods: LED documentation
[3] Adding in the Button #
[Hardware Set Up] #
Now we’re going to connect our push-button to the Raspberry Pi. In addition to what you already have set up, you will need:
- 2 internal-to-internal jump wires
- 1 push-button component
- Connect
1 jumper wireto the37 and 39pins - Connect the
Pin 37wire to the-LED component pin. This is theGroundpin. - Connect the
Pin 39wire to theSLED component pin
[Coding the Button] #
In order to use the push-button, we’ll use another gpiozero class, Button.
💻 Edit
button_activated_light.py so that pressing the button turns the LED light on.
Here’s some information about the Button class to get you started:
| Property | Example Use | Explanation |
|---|---|---|
| is_pressed | button_object.is_pressed | Returns True if the device is currently active and False otherwise |
| Method | Input | Example Use | Explanation |
|---|---|---|---|
| Create a new Button object | GPIO pin | button_object = Button(17) | creates a new Button object for the given pin |
| wait_for_press() | Number of seconds to wait before proceeding. If no parameter is given, it will wait indefinitely | button_object.wait_for_press() | Pause the script until the device is activated, or the timeout is reached |
| wait_for_release() | Number of seconds to wait before proceeding. If no parameter is given, it will wait indefinitely | button_object.wait_for_release() | Pause the script until the device is deactivated, or the timeout is reached |
👾 💬 FYI: Button class
There’s lots that you can do with the Button class, like choosing what happens when the button is held down for a certain number of seconds, and more! Click on the link to learn more methods!
More Button Methods: Button documentation
[Deliverables] #
⚡✨ For this lab, you should push your lab-sensors repository containing updates to
button_activated_light.py
Check in with the teacher by showing your button-activated light!
[4] Extension: Bike Light #
Have you ever used a bike light? When you’re biking in low-visibility conditions, you need a light that’s able to rotate through several different modes:
- a constant, white light (for best visibility)
- a constant, red light (to preserve night-vision)
- a flashing light (to save battery)
- no light (for when you’re not biking)
For your bike light, you want your cyclist to be able to toggle through the 4 modes by holding the button down for two seconds. For example, if the light is off and the user holds the button down for at least two seconds, the light will switch modes to the white light. If the user releases and then holds the button down again, it will switch to the red light, and so on.
✅ CHECKPOINT:
Ask your teacher to show you a demo of a working bike light!
Then in your notebook, write the corresponding pseudocode
💻 Edit
button_activated_light.py so that your Raspberry Pi can be used as a bike light.
Be sure to push any changes you’ve made to your light!