Fresh Baked Pi 🥧
This year, you’ll be using Raspberry Pi’s as our computational companions. Before you get too excited, these are not warm, flakey baked goods, these are tiny computers built entirely on a single circuit board.
But even if these Pi’s might not be as tasty as edible raspberry pies, they are still pretty exciting!
Raspberry what?
Raspberry Pi’s are tiny but powerful computers that can be used for tons of DIY projects. Since Raspberry Pi’s are so small but have full computational, networking, and hardware capabilities, they are great tools for making robots, internet of things devices, networking services, and much more.
👀 Check out some of the projects you can make with Raspberry Pi’s:
Unboxing
The first unit of cs10 will help you get comfortable using your Raspberry Pi by exploring the practice of working over a network, the Linux-based operating system Raspbian, and the basics of the Pi’s hardware.
We’ll provide more materials over the course of the year, but for now your Raspberry Pi kit should look like this:

Raspberry Pi cs10 Starter Kit
Here’s what’s included:
- 1 Raspberry Pi 3B+
- 1 microSD card imaged with the operating sytem and configs we’ll use for the course
- 1 Raspberry Pi case
- 1 USB C (or USB 3) to Micro-USB power cable
- 8 female to female jumpers
- 1 3-color LED component
- 1 temperature sensor (or temperature/humidity sensor)
We will talk more about the hardware components of the Pi in a future unit, but here’s a diagram of each of the parts if you are interested. You can take your Pi out of the case to see what it’s made of.

Raspberry Pi component diagram
You will be using your Pi all year, so you’ve got to take good care of it! Treat it like you would treat a newborn baby if the baby were a computer you were building.
Setup
Now that you’ve got a sense of the layout of your Pi, let’s get setup so you can start coding with it.
👾 💬 FYI
Before you run the setup script, make sure you know the name and password of your home wifi network. If you know that your wifi network has special settings, talk to a teacher before beginning the setup.
Currently, the setup script does not work if your wifi network’s password contains a space. If this is the case, please tell the teaching team before starting the setup.
Connect to Pi’s hotspot
- Take the USB to MicroUSB cable and plug your Pi in. You can plug it into your computer or into a power outlet with a USB power plug. The red and green lights on the side of your Pi should turn on and flash once it is powered.
- Give your Pi a minute or two to boot up. Once it has booted, it will begin broadcasting a wifi signal called
RPiHotspotNwhereNis the number on your Pi.If you don’t see the Pi’s network. Try reboot your Pi by unplugging it and plugging it back in. If you still don’t see the network, try manually adding the network on your computer using
Join other network...and entering the Pi’s network name (RPiHotspotN), selectingWPA/WPA2 Personalfor the security setting, and entering the passwordcs10_setup. - Connect your computer to this wifi network using the password
cs10_setup.This wifi network will not have access to the internet. You will have to temporarily leave the Google Meet. If you have a problem during setup, you will need to reconnect to your regular wifi network and rejoin the Google Meet.
Pi Setup Script
- Once you are connected to the Pi’s hotspot, open a Terminal window on your computer.
- Type the following into your terminal window:
ssh setup@192.168.50.5 - When prompted for a password, enter
setup. Once this command runs, you will be remotely controlling the Pi through the wifi network it is broadcasting! - The Pi will automatically run a setup script. Choose option
0. - Follow the instructions in the script to setup up a new user.
Your username must not contain any spaces. Only the first word you enter will be used.
- Follow the instructions to add your home wifi network into the Pi’s network settings.
- After you finish the setup script, your Pi will reboot and your remote connection will be closed.
Reconnect your computer to your regular wifi network and rejoin the Google Meet.
Using Pi
Your Pi should now be connected to your home wifi network. Now you can connect to it remotely with your computer and it will have access to the internet!
Connecting to your Pi (SSH)
Once your Pi is connected to your home wifi network, you can remotely connect to it with your computer through your wifi router. To understand how this works, you’ll need to learn some basics of networking.
You are probably most familiar with your wifi router because it offers your computer access to the internet. In this case, your computer connects to the router’s wifi network and begins sending messages to the router. The wifi router recieves these messages and forwards them to the appropriate place via the internet.
For example, if you click this link, your computer will send a request to your wifi router to return the content of the page at the URL. Your router will recieve this message and forward it to one of Wikipedia’s servers somewhere in the world. When the Wikipedia server recieves the message, it reads it, packages up the content of the page at the URL, and sends the content back to your router. Your router then forwards this reply to your computer which interprets the content and displays it in your web browser.

Connecting to the internet via wifi
This is obviously an extremely useful feature of your wifi router. You probably use it every day! However, we’re going to use another feature of your wifi router that you may not have used before.
Generally, wifi routers create local area networks (LAN) that create a wireless interface between all the devices connected to the router. For example, if you have a wifi-enabled speaker or printer, your wifi router is probably making the connection between your computer (or phone) and the device. When you want to print something, your computer sends a message to your wifi router containing the file it wants to print. However, rather than being addressed to a destination at a server somewhere far away, this message is addressed to your printer. Your wifi router notices this and forwards the message to your printer through the LAN. When the printer recieves the message, it interprets it and prints the file. Your communication never left the local network created by your wifi router.

Connecting to another deivce over a LAN
Since both your Pi and your home computer are connected to your home wifi network, you can connect to your Pi using your computer using a Secure Shell (SSH) connection.
💻 Follow the steps below to connect to your Pi:
- Make sure your computer is connected to your home wifi network
- In a terminal window, run the command
arp -a. This will list all the devices on your home wifi network. - Look for the device labeled
raspberrypi. If you see it, your Pi has connected to your regular wifi network! - Run the command
ssh USER@raspberrypi, replacingUSERwith the username you created in the setup. - Enter the user password you used during the setup when prompted for a password.
- You should now be remotely connected to your Pi! You’ll know when you’ve connected
to the Pi because your prompt will change to be
YOUR_USER@raspberrypi:~ $
👾 💬 FYI
If you cannot find a
raspberrypidevice on your wifi network, wait a couple minutes to allow the Pi to reboot and connect to the internet. Try running thearp -acommand a couple times. If the problem persists, you may need to re-enter your wifi password. You can do this by reconnecting to theRPiHotspotNwifi network, runningssh setup@192.168.50.5(password “setup”), choosing option 2 from the setup, and reentering your wifi credentials.If you are able to connect to your Pi’s wifi hotspot, it has not been able to connect to a wifi network and you’ll need to re-enter the wifi credentials.
sudo Access
💻 Before we move on, we need to grant you user account administrative access on your Pi. This will also give you the chance to practice logging in and out of ssh connections.
- Exit your current ssh connection by typing
exitin your Terminal window. - Create a new ssh connection, this time to the
piaccount. You can use the commandssh pi@raspberrypi - Enter the password
cs10_2020_teacher - Once logged in, run the following command to give your user admin (or root) access (replace
<YOUR_USER>with the user tou created on the Pi):$ sudo usermod -aG sudo <YOUR_USER> exitthe current ssh connection and reconnect with your user.- Run the command
groupsand make sure thatsudoshows up in the list.
You now have root access which will allow you to install new programs on the pi.
✅ CHECKPOINT:
Stop once you’ve reached this point and make sure everyone in your group has completed the initial Pi setup.
Check in with the teaching team before moving on.
File structure
Because you are remotely connected to your Pi through your Terminal, the Terminal is the only interface you have to naviagte the file structure and run programs. Fortunately, you have tons of experience with this tool from cs9. If you need a refresher, check out the Terminal lab from cs9.
When you log in to your Pi, you will be taken to the home (~) directory of your user. There’s no
Desktop on the Pi, so we’ll treat this as out home base. Just like in cs9, cs10 will have it’s own
direcctory with a directory for each unit and more directories for each lab or project.
💻 Run the following commands to make two new directories:
$ mkdir cs10
$ cd cs10
$ mkdir unit_00
$ cd unit_00
Writing code
The remote connection to the Raspberry Pi also means that there is no graphical interface for text editing. You can’t run Atom on the Pi, only editors that run inside the Terminal. However, there is a way to use a graphical text editor on your computer to edit the files on a remote device like your Pi. To do this, we need to connect Atom to the SSH tool you use to access your Pi.
💻 To set up remote text editing over SSH, run the following commands in a Terminal window on your computer (you may need to put in the password for your computer):
$ sudo apm install remote-atom
$ printf '  "remote-atom":\n    launch_at_startup: true' >> ~/.atom/config.cson
$ printf "Host raspberrypi\n\tRemoteForward 52698 localhost:52698\n\tUser user" >> ~/.ssh/config
💻 Now, run the following lines on your Pi over an SSH connection:
$ sudo curl -o /usr/local/bin/rmate https://raw.githubusercontent.com/aurora/rmate/master/rmate
$ sudo chmod +x /usr/local/bin/rmate
$ sudo mv /usr/local/bin/rmate /usr/local/bin/ratom
Now, whenever Atom is open on your computer and you are connected to your Pi via SSH,
you can use ratom file.py to open a file from the Pi in Atom on your computer!
💻 To set up remote text editing over SSH, run the following commands in a Powershell window on your computer (you may need to put in the password for your computer):
$ apm install remote-atom
$ echo "  `"remote-atom`":`n    launch_at_startup: true" | Out-File -FilePath ~/.atom/config.cson -Append -Encoding ASCII
$ echo "`nHost raspberrypi`n`tRemoteForward 52698 127.0.0.1:52698`n`tUser user" | Out-File -FilePath ~/.ssh/config -Append -Encoding ASCII
💻 Now, run the following lines on your Pi over an SSH connection:
$ sudo curl -o /usr/local/bin/rmate https://raw.githubusercontent.com/aurora/rmate/master/rmate
$ sudo chmod +x /usr/local/bin/rmate
$ sudo mv /usr/local/bin/rmate /usr/local/bin/ratom
Now, whenever Atom is open on your computer and you are connected to your Pi via SSH,
you can use ratom file.py to open a file from the Pi in Atom on your computer!
👾 💬 FYI
If you would like to try using a text editor in the Terminal, you can read about vim or emacs, two popular command line text editors. Talk to the teaching team if you have any questions.
💻 Let’s try this out!
- Close your current SSH connection with
exitand start it again withssh USER@raspberrypi - Create a new file using
ratom hello_world.py. - Type whatever python code you want to into the file that opens on your computer (maybe
print("Hello world!") - Save and close the file.
Running code
Now that you have a Python file on your Pi, you can run your very first Python program from a Raspberry Pi.
💻 Run the following command on your Pi:
$ python3 hello_world.py
Congrats! You are all ready to get started on your first Raspberry Pi project!
👾 💬 FYI
Notice that you need to explicitly usepython3to run your files on your Pi, not justpython.
✅ CHECKPOINT:
Stop once you’ve reached this point and make sure everyone in your group has completed the initial Pi setup.
Check in with the teaching team before moving on.
Your First Pi Project
Programming on Pi
For the first coding project you will create a trivia game.
Your tasks:
- Reacquaint yourself with Python
- Familiarize yourself with coding on the Raspberry Pi
- Play and redesign the trivia game
[0] Setup
To get started, we need to configure the git settings on your Pi so you can push and pull from GitHub.
💻 Enter the following command on your Pi over SSH. Replace the < > with your
information:
$ git config --global user.name <Your name>
$ git config --global user.email <Your school email>
$ git config --global core.editor "ratom --wait"
$ git config --global commit.template .commit_template
$ git config --global credential.helper store
A respository has been created for you with your Github username.
💻 Clone it to your Pi over SSH using the following command (replace
YOUR_GITHUB_USERNAME with your Github username):
$ git clone https://github.com/the-isf-academy/lab-trivia-YOUR_GITHUB_USERNAME.git
💻 Now, use the following commands to install pip and a package we’ll need for this lab:
$ sudo apt install python3-pip
$ pip3 install RPi.GPIO
[1] Trivia File
💻 Start by running python3 game.py t on your Pi over an SSH connection.
This program plays a basic version of the trivia game you will be completing for this lab.
The trivia.txt file contains the questions used in the game. When everyone has completed the lab, we will take turns playing through everyone’s game.
The format for the question types can be found in the README.md.
💻 Start by customise trivia.txt to questions of your choosing. For now, don’t add more than
3 question (you can add more after you finish the other parts of the lab).
[2] Classes and games
In this lab, we’ll work to remind ourselves of classes and objects by building a text-based trivia game.
For your reference, we will start by focusing on the TerminalView of the Trivia Game which utilizes the following classes. Make sure your model includes each of them.
- Game
- View
- TerminalView
- Question
✏️ Read through the documentation pages and make a model for how this implementation of Trivia Game works.
👾 💬 FYI
If you need a refresher on Classes, please reference the below resources.
Constructors: 12.5 Constructors
Inheritance: 12.6 Inheritance
As the program reads trivia.txt creates a Question object for each trivia prompt. However, the Question
class has some bugs.
[2.A] random_choices()
💻 Edit random_choices() to return a list of the choices for the question in a different random order every time it is called.
[2.B] check_guess()
💻 Edit check_guess() to take as input the player’s guess and check to see whether the guess matches the correct answer. If the guess is correct. The function should return True. If the guess is incorrect, the function should return False.
[2.C] play()
In the game.py file, the play() function only plays one round of the game.
💻 Fill in the play() function in game.py. The function should iterate through a list of Question objects and use the View class to receive input and display information. After each question, it should tell the user if they answered correctly or incorrectly. At the end of the game, it should display the user’s score.
[3] Play Game
💻 Now that you’ve got a model for the Trivia Game software, play through a game by running the following command in your terminal:
$ python3 game.py t
Was the gameplay different than you expected? Check you model to see if it still makes sense and change it up if it doesn’t.
✅ CHECKPOINT:
Stop once you’ve reached this point and make sure everyone in your group has completed the initial Pi setup.
Check in with the teaching team before moving on.
Pi Hardware
Now that your trivia game is up and running, we will utilize the GPIO pins on the Raspberry Pi and an LED sensor to signal a correct or incorrect guess to the user.
Your tasks:
- Familiarize yourself with the GPIO pins
- Light up the LED through code and hardware
- Play and redesign the trivia game with LED sensor
[4] Classes, games, and hardware
In this section of the lab, we’ll incorporate hardware into our trivia game to create visual feedback.
We will now focus on the PiView of the Trivia Game which has the following classes. Please note the addition of the PiView and RBILight class. ✏️ Make sure your model includes all of them.
- Game
- View
- TerminalView
- PiView
- Question
- RGBLight
[5] Hardware Set Up
Let’s begin by connecting our LED sensor to the Raspberry Pi.
To connect the LED to the Raspberry Pi you will need:
- 1 Raspberry Pi
- 4 female-to-female jumper cables
- 1 3-color LED component
Below is a diagram of the GPIO pins. Each pin has a specific function and a pin number. For this lab we will use 1 ground pin and 3 GPIO pins. Reference the pin numbers and pin functions when connecting the LED.
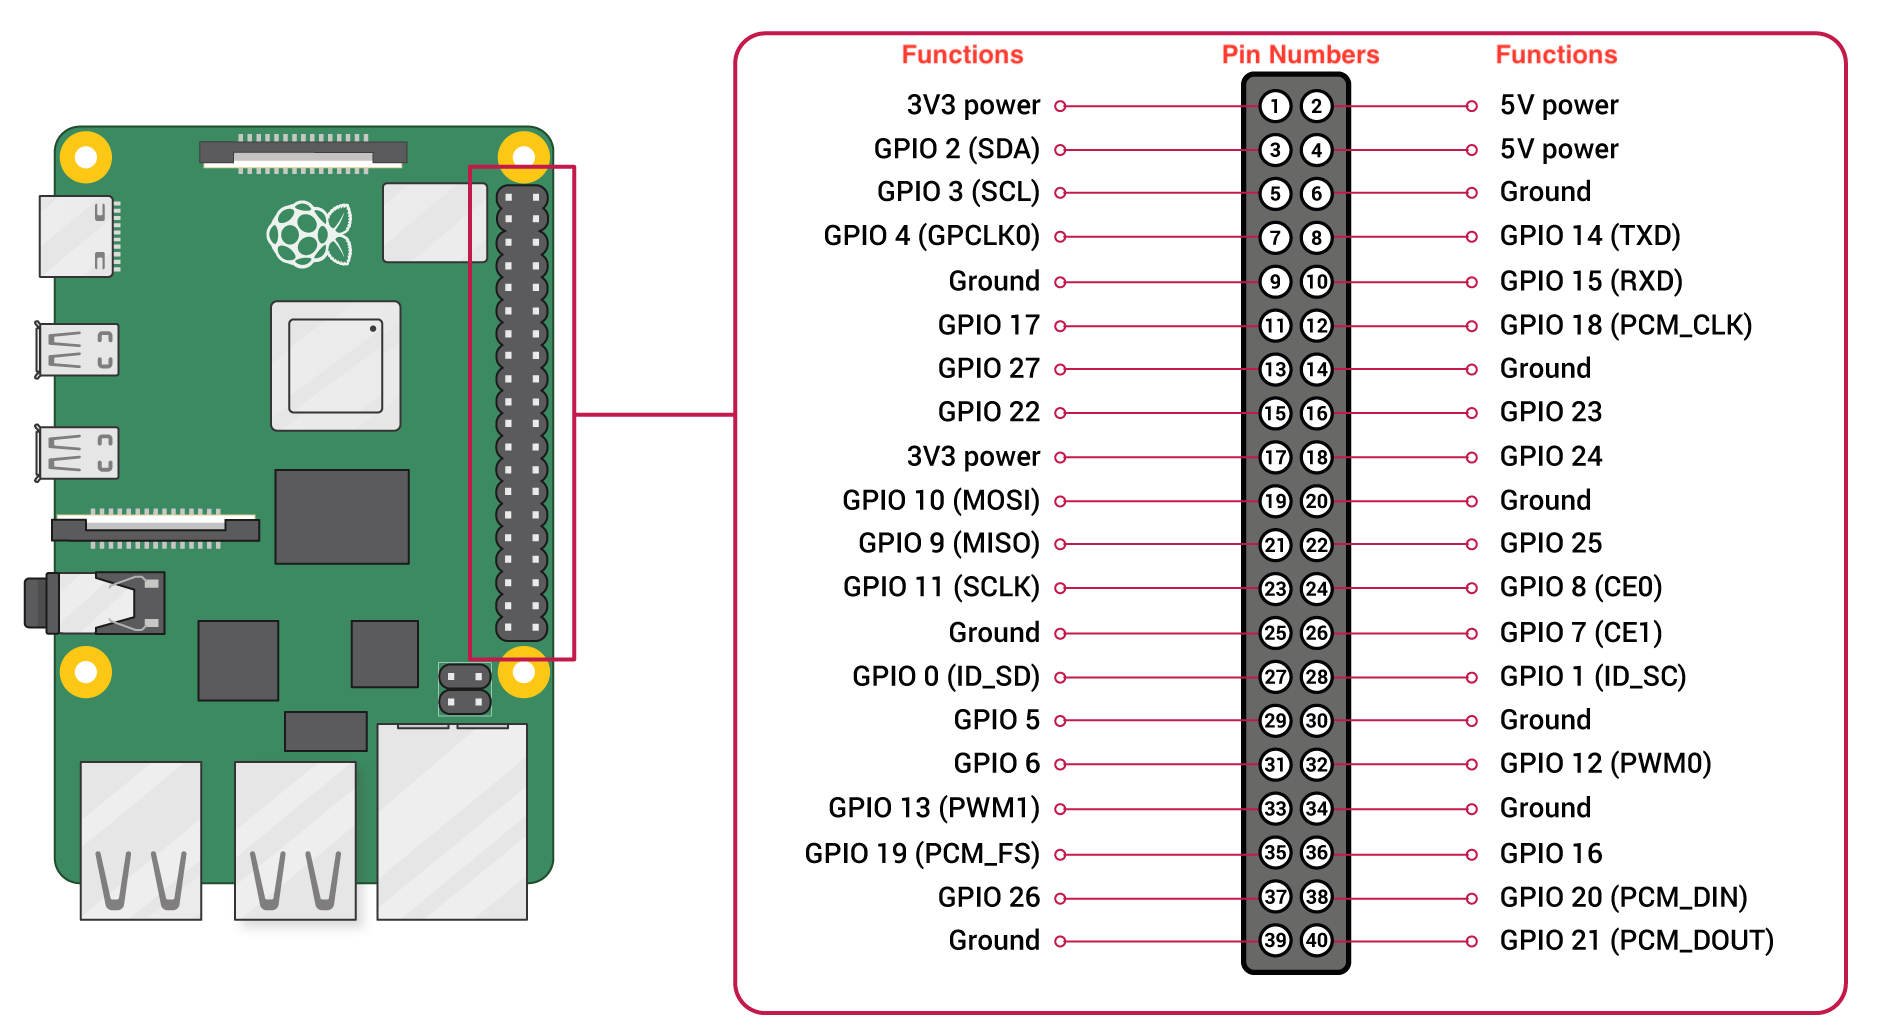
This is how your Raspberry Pi will look when hooked up to the LED.

Although the wires below are color coded, it is not necessary to do so.

By connecting the R, G, and B LED component pins to the GPIO pins of the Raspberry Pi, we are able to send power to each color. The Ground LED component pin completes the circuit, allowing power to flow through and power the LED.
💻 Hook up your LED sensor to your Raspberry Pi
- Connect
1 jumper wireto the9, 11, 13, and 15pins - Connect the
Pin 9wire to theGroundLED component pin - Connect the
Pin 11wire to theRLED component pin - Connect the
Pin 13wire to theGLED component pin - Connect the
Pin 15wire to theBLED component pin
[6] Coding the LED
Now that the LED is connected to the Raspberry Pi, we can integrate the LED into the Trivia game. By editing the PiView child class in view.py you will program the light to display different colors depending on if the user entered the correct or incorrect answer.
The PiView child class creates an instance of an LED object which is coded in the rgb.py file. By calling the changecolor() function on a RGBLight object, you can manipulate the color the LED emits. Each R, G, and B color pin work together to create one unified color. Each pin can be activated or deactived through binary code.
👾 💬 FYI
Reference the below resources to learn more about RGB light and binary code.
👀RGB Light: How an RGB LED works and how to use one! | Basic Electronics
👀Binary How exactly does binary code work? - José Américo N L F de Freitas
Review changeColor() in rgb.py and experiment with the function in the PiView class.
6.A correctAnswer()
💻 Edit correctAnswer() to set the color of the LED to green. For each question, the LED should light up green if the user answers correctly.
6.B wrongAnswer()
💻 Edit wrongAnswer() to set the color of the LED to red. For each question, the LED should light up red if the user answers incorrectly.
👾 💬 FYI
To learn more about how the GPIO pins communicate with Python, take a look at
rgb.py. Reference the chart below to better understand how the LED is activated. Note how there is not a specific GPIO function for changing the color of the LED.
Function Parameters Explanation Example Function setmode(arg) BOARD or BCM Sets GPIO numbering mode setmode(BOARD) setup(arg,arg) PIN number, IN or OUT Sets GPIO pin to receive input or send output setup(PIN,GPIO.OUT) output(arg,arg) PIN number, HIGH or LOW Sets GPIO pin to on or off output(PIN,GPIO.HIGH) cleanup() None Resets all GPIO pins used cleanup() Steps to Turning Off and On the LED:
- Set PINS to output mode
- Set power of each color PIN to HIGH
- Set power of each color PIN to LOW
- Clean Up
[7] Play Game
💻 Now that you’ve got an updated version of your Trivia Game software, play through a game by running the following command in your terminal:
$ python3 game.py p
Did the LED work as you expected? If not, review the hardware and the PiView class.
Deliverables
Congratulations on completing your first Raspberry Pi project! We hope you enjoyed this introduction to the Raspberry Pi and its many functions.
To submit this lab please:
- Make sure your
random_choices(),check_guess(), andplay()functions pass the test harness. Runningpython3 test_lab.pyshould return no errors. - Take a picture of your Pi with the LED connected (and on!). Add this file to your git repository.
- Commit your code and push to Github.